You may have noticed the Embedder logo showing up all over the place on the blog. I used to do this for another plugin I wrote many moons ago—but to do it, I would have to cut and paste the same HTML code into every post I wanted it in.
There are a couple of nice templating plugins I could have used, I guess, but it always seemed like overkill for plugging in a little bit of HTML here and there. And if I wanted to change things later, I would still have to go back into each post and change everything by hand.
But, now that I have the Embedder plugin, it took me about five minutes to create a new global embed for the logo and make it show up automatically on every post in the Embedder Plugin category! The best thing is, if I want to change anything—the positioning, the image, or even which posts or pages I display it on, all I have to do is modify the embed’s settings. No editing of posts needed.
So here’s how you do it:
- First you need to upload the logo image you are going to use in your posts to your blog, and make a note of its url.
- Next go to the Settings >> Embeds settings page in your blog’s Site Admin section, and click on the add new link at the top of the page.
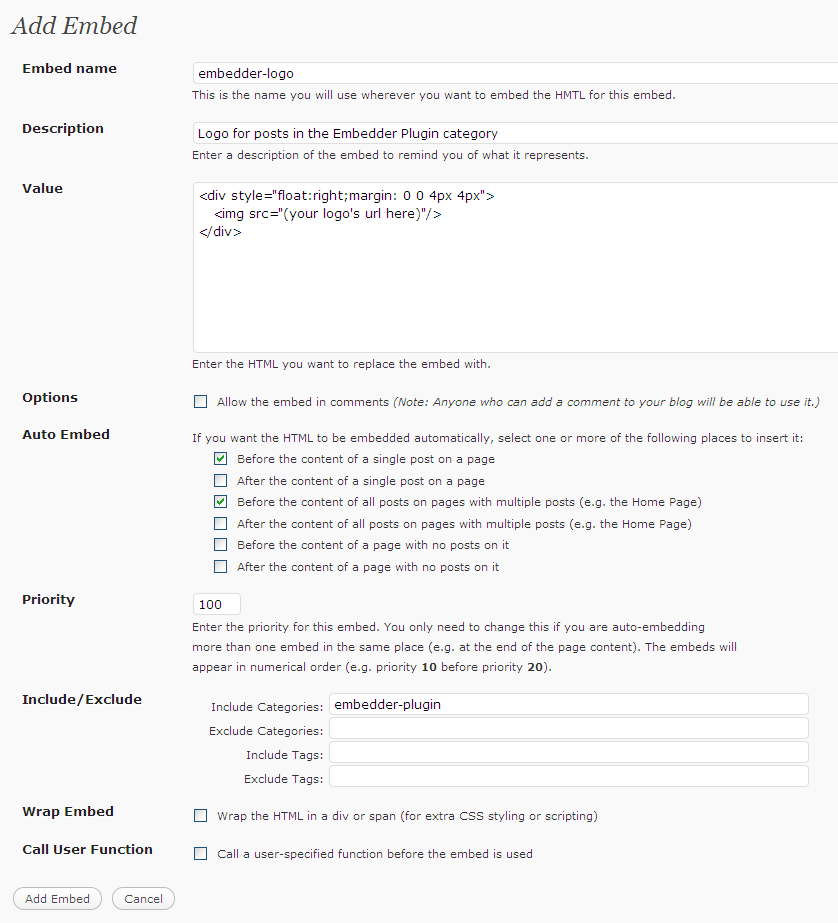
- Give the new embed a name (I used embedder-logo) and a useful description (e.g. Logo for posts in the Embedder Plugin category).
- Give the embed the following Value:
<div style="float:right;margin: 0 0 4px 4px">
  <img src="(your logo's url)"/>
</div>
(Use the url of your uploaded logo instead of the red text.)
How you style your logo is up to you. All I did was to float the logo to the right of the page and add small margin to the logo’s left and bottom so the post’s text doesn’t bump right into the image. Alternatively you could float the image to the left (in which case you would move the margin to the right) or you can add a border around the image, more padding, or even add a caption below the logo.
You will have to use either float:left or float:right if you want the logo to appear inline with the text, otherwise it will appear above the text instead. And while I have chosen to use CSS style attributes directly in the embed, you can always use a CSS class name to reference a stylesheet instead, if you prefer.
- Now comes the magic of Embedder. You can use the embed without setting any more options, but you would have to manually add the logo to every post you want it in, which would defeat the whole point of this exercise. Therefore we need to set a couple more options before we’re done.
- For the embedder-logo embed, I selected two options in the Auto Embed section:
Before the content of a single post on a page
Before the content of all posts on pages with multiple posts (e.g. the Home Page)This turns the embed into an auto-embed, which means that it will automatically appear in the places you specify—in this case, at the head of every post whether the post is on its own page, or part of a page like the blog’s home page, or category page.
- But we’re not done yet. If you use the embed like this, the logo will appear in every post on your blog, and I doubt that’s what you want. So we need to tell the plugin exactly where it should be using the embed.In my case, that’s easy—I want it to appear in every post in the Embedder Plugin category, so all I have to do is add the category name (or slug) to the Include Categories setting in the Includes/Excludes section:
Include Categories: embedder-plugin
I used the categories slug name (found by looking in the Posts >> Categories page), but the actual category name would work too (as long as it doesn’t have a comma in it).
- There is just one more setting you might have to set, but only if you are using more than one auto-embed at the start of your posts. For example, you might decide to use a range of icons to tag your posts with depending on the subject matter. If you do, then you need to tell the plugin the order in which you want the embeds to be inserted.You do this using the Priority setting. The lower the number, the higher the priority (as in “the number one priority”) and earlier the embed is inserted. So in my case, I gave the embedder logo embed a priority of 100, meaning that I will probably want it to be added last if I start using more auto-embeds.
- Now we’re done—just click the Add Embed button to save the new embed and (assuming you have entered everything correctly, especially the url of your logo image) the logo will begin appearing auto-magically in your posts! If you don’t like the way it looks, all you have to do is edit the embed and modify the HTML and/or CSS styles to suit your tastes.
Here is a screen shot of the completed settings page. You can click on it for a closer look, but be aware that some new settings and options may have been added since this screen shot was taken:

