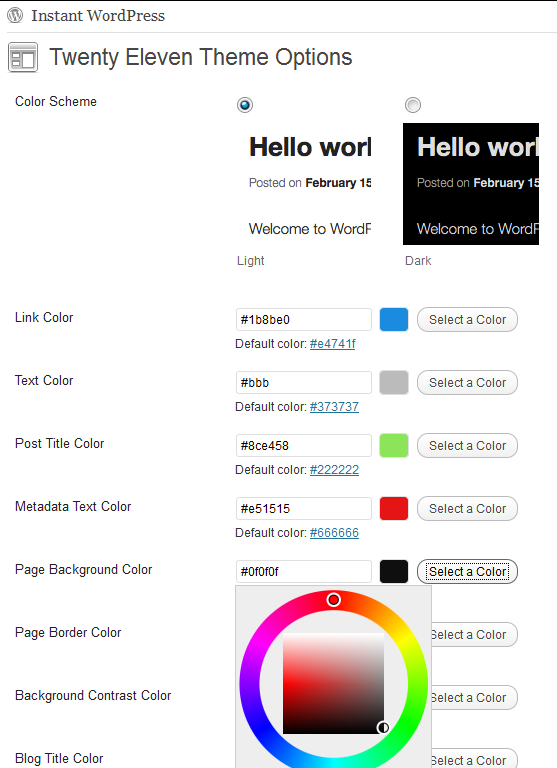
If you turn on the option Custom Colors and then head on over to the Theme Options page, you will find that twelve new color selection options will now be available to you. By default, they will be set to the colors specified in the selected scheme at the top of the page, but as soon as you change any of them, the color you set will override the scheme’s default color.
If you switch color schemes, then any colors you have not set individually will change automatically, but the others will remain the same.
Before you start changing individual colors, you should decide whether you want your color scheme to be based on the Light or the Dark scheme first, set that scheme, and then start changing the colors. You can always reset a color back to the current scheme’s default value.
Here is a list of the colors you can change, with an explanation of what parts of the theme are affected:
- Link Color: sets the text color of all the links on the page.
- Post Text Color: sets the default text color for the content of the blog posts and pages.
- Post Title Color: sets the color of post and page titles.
- Post Metadata Text Color: sets the color of the text that annotates a post’s metadata–i.e. tags, categories, author, and date, etc. Note: the metadata text is made up of links, so uses the link color setting above. This setting allows you to change the color of the other bits of text that are typically shown at the bottom of a post.
- Page Background Color: sets the background color of the blog posts and pages. (Note: if you change this color to something other than white (with the Light color scheme) or black (with the Dark color scheme), then the comment speech bubbles will appear to be set inside a rectangle or white/black, which looks a little ugly. The plugin doesn’t current provide a way to fix this, but several WordPress blogs and forums have articles explaining how to get rid of them if you don’t like what you see.)
- Page Border Color: sets the background color of the border around the blog page.
- Background Contrast Color: sets the background color of elements on the web page that are a normally a slightly different color to the background color. Sets the Widget Calendar header and footer backgrounds, the comments link balloon background, the edit post button background, and the monospaced text area (“pre”) background. (Note: these elements are actually set to slightly different colors in the Light and Dark schemes, but the differences are minor, and for ease of use, they have been put collected under the same color setting.)
- Blog Title Color: sets the text color of the blog title.
- Blog Description Color: sets the text color of the blog description next to the title.
- Header Background Color: sets the background color of the header area.
- Menu Background Color: sets the menu background color. Note: unlike the Light and Dark schemes, this color setting is also used as the background color for the drop-down submenus, making the whole menu experience a little more consistent, colorwise.
- Menu Highlight Color: sets the highlight background color for the menu bar and submenus. Also used in the border between menu items in the drop-downs.
- Menu Text Color: sets the menu text color for the menu bar and submenus.
The CSS for these settings is inserted at or near the end of the header tag of the page. It is embedded directly, and not as an included stylesheet.
Javascript is used to display the new color settings on the Theme Options page, so if you have Javascript turned off, you will not see the new settings. However, readers of your blog do not need Javascript enabled to see the colors you set for your theme.
While the addition of twelve extra color settings adds to the versatility of the Twenty Eleven theme, I have no doubt that many people will find that the new settings don’t include one or two of the color settings they would love to change. If you are one of those people, then there alternative ways available for setting those colors:
- Firstly, you can use the Custom CSS option provided by this plugin. Go to the Theme Extensions page and enable the option, and any CSS definitions you add to the text box there will be included in your blog pages. To find out what you need to change, edit the styles.css file using the Appearance >> Editor page.Custom CSS styles are always insert into the page after the Custom Color CSS definitions, so that can be used to override some or all of them, if necessary.
- Secondly, you can create a child theme for your changes. This is the recommended way if you want to make more than just a few tweaks to the theme’s CSS. (Remember to keep the words “Twenty Eleven” in your child theme title if you want to keep using the Theme Extensions plugin.)
- Finally, if you’re not afraid of a little simple PHP code, you can add your own color settings to the Theme Options page (and remove or modify the ones that are already there) by filtering the configuration data the plugin uses to build the settings. For more information on how to do this, see Adding Your Own Custom Color Settings.